L2MUMS
Level 2 Manned/Unmanned System (L2MUMS)
Overview
The Level 2 Manned/Unmanned System (L2MUMS) allows for the transmission of video and metadata between aircraft. It can be used to transmit and receive sensor data in real time between both unmanned and manned platforms.
While users can both receive data from another platform and transmit their own data at the same time, the receiver has no control over the platform that is transmitting data or the transmission itself.
The L2MUMS is a federated system that runs on a separate processor stored in the rear of the aircraft.
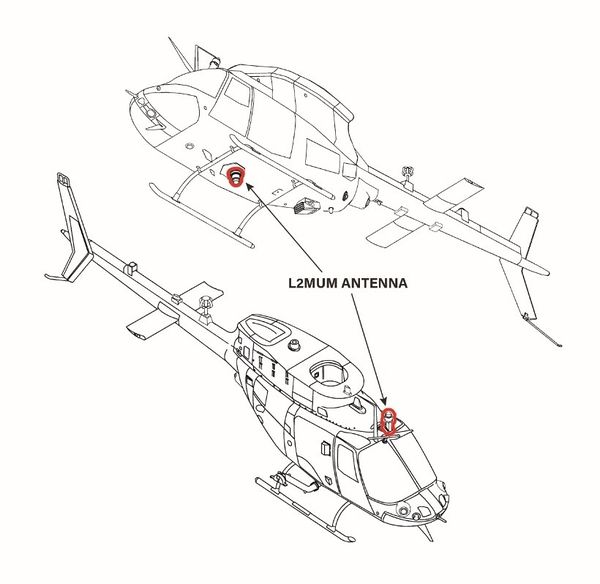
Two antennae mounted on the top and bottom of the aircraft allow line of sight communication to other platforms.
The Copilot’s MFD displays data from the L2MUMS, and is used to make inputs to the system. The Copilot can select whether the MFD displays and accepts input for either the IMCPU or L2MUMS by pressing the INIT bezel on the MFD.
Pages
Platform Reception Selection
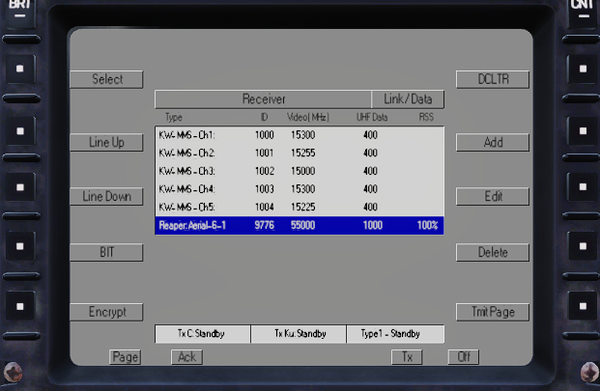
The Platform Reception Selection page is used to select and connect to incoming transmissions. There are 5 preset channels for Kiowa-to-Kiowa communication, while any available unmanned platforms are displayed below.
- List of available channels. The selected channel is highlighted. Each channel has a Type Name, ID, Frequency, Bandwidth and Relative Signal Strength (RSS). RSS is only displayed when the channel is selected
- L1. Select.
- Selects the highlighted channel for reception of data
- L2. Line Up.
- Highlights the previous entry in the list
- L3. Line Down.
- Highlights the next entry in the list
- L4. BIT.
- Not implemented
- L5. Encrypt.
- Not implemented
- R1. DCLTR.
- Activating this bezel enables the declutter mode, hiding the bezel key text
- R2. Add.
- Not implemented
- R3. Edit.
- Not implemented
- R4. Delete.
- Not implemented
- R5. Tmit Page.
- Navigates to the Platform Transmission Selection page
- B1. Page.
- Navigates to the Video Display page
- B2. Ack.
- Acknowledges L2MUMS alerts
- B3. Tx.
- Toggles and indicates transmission of sensor data
- B4. Off.
- Not implemented
Platform Transmission Selection
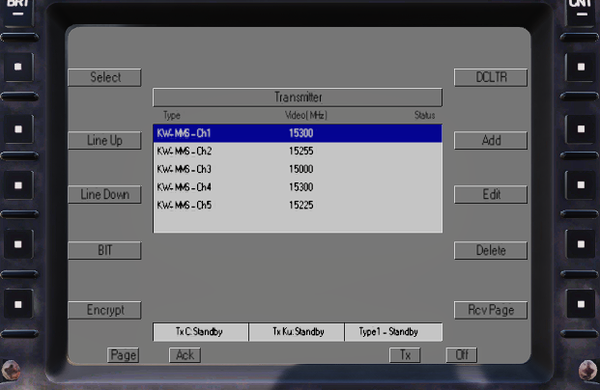
The Platform Transmission Selection page is used to select a preset channel on which to transmit the video and sensor data from the player aircraft.
- List of available channels. The selected channel is highlighted. Each channel has a Type Name, Frequency and Status. Status is only displayed when the channel is selected
- L1. Select.
- Selects the highlighted channel for reception of data
- L2. Line Up.
- Highlights the previous entry in the list
- L3. Line Down.
- Highlights the next entry in the list
- L4. BIT.
- Not implemented
- L5. Encrypt.
- Not implemented
- R1. DCLTR.
- Activating this bezel enables the declutter mode, hiding the bezel key text
- R2. Add.
- Not implemented
- R3. Edit.
- Not implemented
- R4. Delete.
- Not implemented
- R5. Rcv Page.
- Navigates to the Platform Reception Selection page
- B1. Page.
- Navigates to the Video Display page
- B2. Ack.
- Acknowledges L2MUMS alerts
- B3. Tx.
- Toggles and indicates transmission of sensor data
- B4. Off.
- Not implemented
Video Display
The Video Display page displays the video feed from the connected platform, as well as target and platform metadata.
- Video Display
- North Indicator and Stare Point Marker. Indicates relative bearing to north
- Stare Point position and elevation
- Relative bearing and distance from Receiving platform to Stare Point, and Current Time
- Platform Position and Altitude
- Platform Heading and Sensor Heading (green)
- Sensor Elevation
- L1. Pause.
- Not implemented
- L2. Capture.
- Not implemented
- L3. Lat/Long or UTM.
- Toggles metadata display between UTM and Lat/Long coordinate systems
- R1. DCLTR.
- Activating this bezel enables the declutter mode, hiding the bezel key text
- R2. Overlay.
- Successive presses of the Overlay bezel cycle the overlay mode:
- OFF (no overlays displayed)
- Level 1 (Stare Point Marker and North Indicator are displayed)
- Level 2 (Stare Point and Relative Position data in top left and top right are displayed along with all items from Level 1)
- Level 3 (Platform Position and Altitude at bottom are displayed along with all items from Level 2 and Level 1)
- Level 4 (Platform and Sensor Heading icons and Sensor Elevation icons are displayed along with all items from Level 3, Level 2 and Level 1)
- R3. Start Rec.
- Not implemented
- R4. Recall Tgt.
- Not implemented
- B1. Page.
- Navigates to the Map Display page
- B2. Ack.
- Acknowledges L2MUMS alerts
- B3. Tx.
- Toggles and indicates transmission of sensor data
- B4. Off.
- Not implemented
Map Display
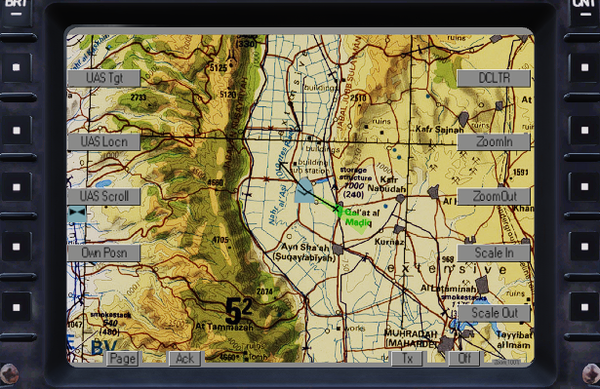
The Map Display page shows the platform, sensor and target data overlayed on chart maps.
- Platform Position
- Own Position
- Platform Heading
- Stare Point Location and Sensor Field of View
- L1. UAS Tgt.
- Momentarily centers the map on the Stare Point
- L2. UAS Locn.
- Momentarily centers the map on the Platform Position
- L3. UAS Scroll.
- Centers and locks the map on the Platform Position. When the map is locked and the bezel text is highlighted blue, the other centering keys are disabled. A successive press of the L3 bezel disables the locking
- L4. Own Posn.
- First press of this bezel momentarily centers the map on Own Position. A second press of this bezel locks the map on the Own Position. When the map is locked and the bezel text is highlighted blue, the other centering keys are disabled. A successive press of the L4 bezel disables the locking
- R1. DCLTR.
- Activating this bezel enables the declutter mode, hiding the bezel key text
- R2. Zoom In.
- Increases the map zoom. Available zoom levels are 50%, 75%, 100%, 200% and 400%. Current zoom level is displayed at the bottom right of the map
- R3. Zoom Out.
- Decreases the map zoom. Available zoom levels are 50%, 75%, 100%, 200% and 400%. Current zoom level is displayed at the bottom right of the map
- R4. Scale In.
- Increases the map scale. Available scales are 1:50000, 1:100000, 1:250000 and 1:500000
- R5. Scale Out.
- Decreases the map scale. Available scales are 1:50000, 1:100000, 1:250000 and 1:500000
- B1. Page.
- Navigates to the Platform Reception Selection page
- B2. Ack.
- Acknowledges L2MUMS alerts
- B3. Tx.
- Toggles and indicates transmission of sensor data
- B4. Off.
- Not implemented


